
|
You are here : Purchase > Purchase Order Functions > Service PO Amendment Service PO Amendment |
This option provides the facility to make changes in existing authorized Service Purchase Orders that were created directly or against Indents through Service PO option.
The screen for this option is similar to Service PO option with certain fields disabled as they can not be changed during amendment.
A list of already existing Service Purchase Order Amendments will be displayed as follows-
Enter any text you want to search in the list below. The search is applicable to all columns of the list. Once the text is entered, press <ENTER> key. As a result, the list will be refreshed with all those records that contain the entered text fully or partially. In order to go back to the original list, remove the text from the box and press <ENTER> key again.
IMMS provides the facility to filter the records on the basis of their status. Click on the field and select either 'All', 'Authorized' or 'Pending for Authorization'. Selecting 'All' will display all records, authorized as well as unauthorized. Selecting 'Authorized' will display only authorized records. Selecting 'Pending for Authorization' will display only those records that are yet to be authorized.
|
Once a Service Purchase Order is amended, it is necessary to authorize that Amendment. This is a part of security measure which IMMS offers so that the Service Purchase Orders are accessed by authorized staff only. Once an Amendment is authorized, it becomes unavailable for any more changes.
To authorize a particular Service Purchase Order Amendment, select the corresponding record by clicking on the small white check box. You can de-select the record by clicking on the same box again. You can select multiple records in the same way. Once done, click on the |
 Service Purchase Order Amendment can be added, and viewed provided the Role associated with the currently logged-in user through User Management has the respective rights to do so.
To 'Add' a Service Purchase Order Amendment, click on the  button and to view details of a particular Service Purchase Order Amendment, <DoubleClick> on that record. As a result, following screen will be displayed -
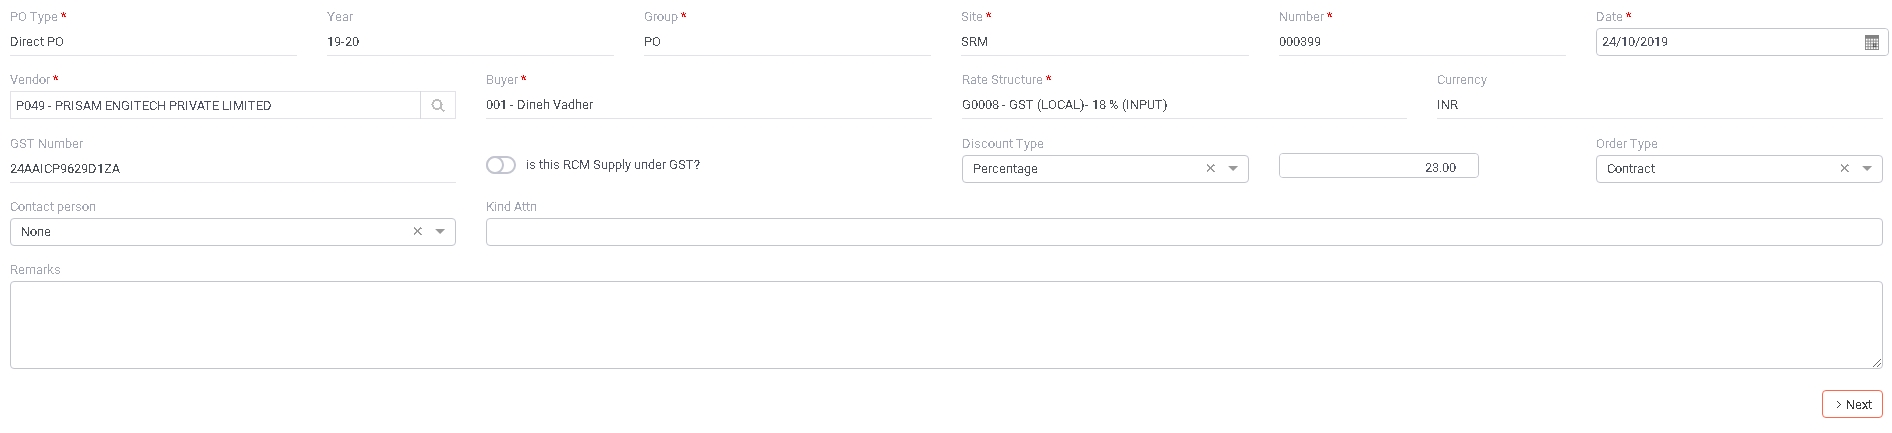
PO Type:
Specify whether the Service Purchase Order is a direct one or against an Service Indent by selecting appropriate option from the popup. Select 'Direct PO' if the PO is not against any Service Indent or 'Indent Based' if it is against an Service Indent.
Year:
Specify the Financial Year of the Service Purchase Order.
In 'Add'mode, current financial year will be displayed by default. You can change it to the financial year of the desired Service Purchase Order that has to be amended.
In case of 'View', financial year of the selected Service Purchase Order Amendment will be displayed automatically.
Group:
Specify the Group of the Service Purchase Order.
In 'Add' mode, the Group which has been specified as default for the selected financial year and Type through Document Control Master
option in Administrator Toolswill be displayed automatically.
You can change it by clicking on the field to access a list of already defined Service Purchase Order Groups for the entered Year though Document Control Masteroption in Administrator Tools Module. Select your desired Group from the list by scrolling down to it and pressing <ENTER>. Alternatively you can also enter the Group.
In case of 'View', Group of the selected Service Purchase Order Amendment will be displayed automatically.
Site:
Specify the Site of the Service Purchase Order.
In 'Add' mode, the Site if any specified with the selected Group
Click on the field to access a list of already defined Sites. Select your desired Site from the list by scrolling down to it and pressing <ENTER>. Alternatively you can also enter the Site.
In case of 'View', Site of the selected Service Purchase Order Amendment will be displayed automatically.
Number:
Specify the Service Purchase Order Number that has to be amended.
In 'Add' mode, click on the field to access a list of Service PO Numbers already existing for the selected PO Type, Year, Group and Site. Select your desired Number from the list by scrolling down to it and pressing <ENTER>. Alternatively you can also enter the PO Number. Press <TAB>. All the other relevant data is displayed automatically.
Please note that only those Service Purchase Orders will be displayed/accepted against which Amendment has not be done yet.
Amendment is possible in an existing Service Purchase Order ONLY if that Service Purchase Order is authorized and physically printed.
In case of 'View', Number of the selected Service Purchase Order Amendment will be displayed automatically.
Date:
Automatically displays the Date of selected Service Purchase Order .
In 'Add' mode,you can change it but it can not be later than today's date or Current Period End Date.
In case of 'View', Date of the selected Service Purchase Order Amendment will be displayed automatically.
Vendor:
Automatically displays the Vendor of selected Service Purchase Order . You can NOT change it.
Buyer:
Automatically displays the Buyer of the selected Service Purchase Order . You can NOT change it.
Rate Structure:
Automatically displays the Rate Structure of the selected Service Purchase Order . You can NOT change it.
Currency:
Currency of the Vendor is displayed automatically from Vendor Master Entry option. You can NOT change it.
GST Number:
Automatically displays the GST Number of the selected Vendor as specified through Vendor Master Entry option. It can not be changed.
Is Purchase Against CT3?
Please note this option will be displayed only if the currently logged in Company has been defined as EOU Company by setting the field 'This is EOU Unit Company?' as 'On'
In 'Add' mode, turn this option 'On' by clicking on it if the selected Service Purchase Order is against the CT3 Form. In case the Purchase in NOT against the CT3 Form, do not click on the option and keep it 'Off'.
In case of 'View', the value of this field will be displayed automatically for the selected Service Purchase Order Amendment.
Denotes whether the Service Purchase Order is under Reverse Charge Mechanism in GST or not.
In 'Add' mode, turn this option 'On' by clicking on it if the selected Service Purchase Order is an RCM supply under GST. In case the Purchase in NOT under RCM supply, do not click on the option and keep it 'Off'.
In case of 'View', the value of this field will be displayed automatically for the selected Service Purchase Order Amendment.
Discount Type:
Automatically displays the Discount Type of the selected Service Purchase Order .
You can change it in 'Add' mode. Select 'None', 'Percentage' or 'Value' from the popup to specify the Type of Discount offered on the Service Purchase Order.
In case of 'View', Discount Type will be displayed automatically for the selected Service Purchase Order Amendment.
Discount Value:
Automatically displays the Discount Value of the selected Service Purchase Order .
You can change it in 'Add' mode. In case of 'Percentage' or 'Value', enter the Value of Discount in Rupees. In case of 'None', this field will be disabled.
In case of 'View', Discount Value will be displayed automatically for the selected Service Purchase Order Amendment.
Order Type:
Automatically displays the Order Type of the selected Service Purchase Order .
You can change it in 'Add' mode. Specify the type of Service PO by selecting either 'Service' or 'Contract' from the given popup.
In case of 'View', Order Type will be displayed automatically for the selected Service Purchase Order Amendment.
Contact Person:
Denotes the Contact Person of the selected Vendor.
In 'Add' mode, a list of all Contact Persons specified for the selected Vendor through Vendor Master Entry option will be displayed in a popup. Select the appropriate Contact Person by clicking on it. In case there is no Contact Person specified, this list will be displayed empty.
In case of 'View', Contact Person for the selected Service PO Amendment will be displayed automatically.
Kind Attn:
(Type: Alphanumeric, Length: 40)
Automatically displays the value in this field for the selected Service Purchase Order.
You can change it in 'Add' mode.
In case of 'View', Kind Attn will be displayed automatically for the selected Service Purchase Order Amendment.
Remarks:
Automatically displays the Remarks, if any of the selected Service Purchase Order.
You can change it in 'Add' mode.
In case of 'View', Remarks will be displayed automatically for the selected Service Purchase Order Amendment.
Click on  button to continue.

This grid will be populated with all the Items specified in the selected Service PO Number.
No new Item can be added while amending a Service Purchase Order.
In 'Add' mode, Item and Delivery Details will be displayed for the selected Service Purchase Order. You can make changes.
In case of 'View', Item and Delivery Details will be displayed for the selected Service Purchase Order Amendment. You can NOT make changes.
Please note that A Delivery Schedule can NOT be changed for an 'Indent Based' Service Purchase Order.
Enter data in the following fields. Rest of the fields are for display purpose so that you can use the information while entering data.
Field Description of the grid -
Action
Click onicon to enter the Delivery Schedule of the Item.
Read more...
Click on the
icon to remove a record from the grid. Click on the 'Delete' icon again to un-delete the record. Please note that you can delete a Delivery Schedule only in case of a 'Direct PO'. This icon will not be displayed in case of 'Indent Based' PO.
Item Code
Displays the Service Item Code to be purchased .
In 'Add' mode, click on the
icon to access a list of Items. Select your desired Item from the list by scrolling down to it and click on 'Continue' button.
Following checks are performed while selecting the Item -
- Only those Service Items that belong to the combination of selected Vendor and Rate Structure defined though Item Master - Servicewill be considered.
- While generating a Direct PO, only those Service Items will be considered which do not need to be indented first before making a Service Purchase Order for them (Refer Item Indent Settings option in Planning Module
Item Description
Description of the selected Item Code will be displayed automatically.
UOM
Automatically displays the Unit of Measurement of the Service Item as specified through Item Master - Service option. You can NOT change it.
Indent Number
Displays the Indent details of the Service Item to be purchased . You can NOT change it.
Indent Date
Displays the Indent date of the Service Item to be purchased . You can NOT change it.
Indent LineNo
Indent Qty
Displays the Indent quantity of the Service Item to be purchased . You can NOT change it.
Alr Po Qty
The quantity of the Service Item already purchased till now against this Service Purchase Order will be calculated and displayed automatically for your reference. You can not change it.
Quantity
Denotes the Service Purchase Order Quantity of the Service Item. You can NOT change it.
Amendment Qty
Automatically displays the Purchase Order Quantity of the Service Item. You can change it to enter the amended quantity of the Item.
While 'Adding' an amendment of a Service Purchase Order -
- in case of a 'Direct' PO, click on the field to enter the new Quantity. Press <TAB>.
in case of 'Indent Based' PO, the quantity of the Service Item can be changed depending upon the following condition -
'Quantity' is a flag driven entry and depends upon the setting of flag 'Allow PO Qty > Indent Qty While Making PO from Indent?'
In case of 'View', the Quantity of the Item will be displayed.
Basic Price
The Basic Price of the Item mentioned in the selected Service Purchase Order will be displayed automatically. You can change it.
Discount Type
Automatically displays the Discount Type of the Item as mentioned in the selected Service Purchase Order. You can change it in 'Add' mode.
To change it, click on the field. Click on the small arrow to open the popup. Select either 'None', 'Percentage' or 'Value' from the popup to specify the Type of Discount.
In case of 'View', the Discount Type will be displayed automatically for the selected Service Purchase Order Amendment.
Discount Value
Automatically displays the Discount Value of the Item as mentioned in the selected Service Purchase Order. You can change it in 'Add' mode.
In case type is chosen as 'Percentage' and 'Value', enter the Value of Discount. In case of 'None', this field will be disabled.
In case of 'View', the Discount Value will be displayed automatically for the selected Service Purchase Order Amendment.
Ser. Req From Date
Automatically displays the Service Required From Date of the Item as mentioned in the selected Service Purchase Order. You can change it in 'Add' mode.
Click on the field. Now enter/select the date starting which the Service is required. Press <TAB>. This date can not be before the Service Purchase Order date.
To Date
Automatically displays the Service Required up to Date of the Item as mentioned in the selected Service Purchase Order. You can change it in 'Add' mode.
Click on the field. Now enter/select the date up to which the Service is required. Press <TAB>. This date can not be before the 'Service Req From Date'.
In case of 'View', To Date will be displayed automatically for the selected Service Purchase Order Amendment.
Bill Certification Method
Automatically displays the Bill Certification Method of the Item as mentioned in the selected Service Purchase Order. You can change it in 'Add' mode.
Select 'Quantity wise' or 'Percentage wise' from the popup to specify the Bill Certification Method.
Remarks:
Automatically displays the Remarks of the Item as mentioned in the selected Service Purchase Order. You can change it in 'Add' mode. To do so, click on the field and enter the Remarks.
In case of 'View', Remarks will be displayed automatically for the selected Service Purchase Order Amendment.
SAC Code:
Automatically displays the SAC Code for the Vendor and current Service Item relationship entered through Item Master Service option. It can not be changed.
Click on button to continue.

A grid populated with Rate Codes included in the Rate Structure of the selected Service Purchase Order as specified through Rate Structure Master Entry option is displayed. None of the information here can be changed. Field Description of the grid -
Index:
Automatically generated sequence number.
Rate Code:
Automatically displays the Rate Code belonging to the Rate Structure for your reference.
Rate Desc:
Automatically displays the Description of the Rate Code belonging to the Rate Structure for your reference.
I/E:
Automatically displays whether the selected Rate Code is Included or Excluded as specified through Tax Rate Master - Entry option for your reference. It can NOT be changed.
P/V:
Automatically displays whether the value of the selected Rate Code is in Value or Percentage as specified through Tax Rate Master - Entry option for your reference. It can NOT be changed.
Applicable On:
Automatically displays the Rate Codes on which this particular Rate Code is applicable.
Tax Value:
Automatically displays the Value of the selected Rate Code as specified through Tax Rate Master - Entry option for your reference.
Post/Non Post:
Automatically displays whether the selected Rate Code is Postable or Non Postable in Purchase as specified through Tax Rate Master - Entry option for your reference. If it is Postable, the box will be displayed as checked otherwise it will be displayed empty.
Rate Amount:
In case of 'Percentage', the Rate Amount field in the grid is calculated automatically as % (enterered in Tax Value field) of Total Amount. In case of 'Value', the entered amount of tax is displayed.
Currency Code:
Automatically displays the Currency of the selected Rate Code as specified through Tax Rate Master - Entry option for your reference.
The Rate Structure chosen in Header Detail tab is displayed automatically. It can not be changed here.
PO Basic Amount is automatically calculated as sum total of (Quantity * Basic Price) - Disc Value of all Items in Item Detail-Delivery Schedule tab.
Also automatically calculates and displays the Basic Amount in foreign currency if the Vendor deals in foreign currency.
PO Basic Value After PO Disc is automatically calculated as PO Basic Value After Item Disc - Disc Value.
where Disc Value is picked up from Header Detail tab.
Also automatically calculates and displays the Amount in foreign currency if the Vendor deals in foreign currency.
Automatically calculates and displays the total of 'Rate Amount' in Domestic Currency for your reference.
Automatically calculates and displays the total of 'Rate Amount' in Foreign Currency if the Vendor deals in foreign currency.
PO Value After Tax is automatically calculated as PO Basic Value After PO Disc + Taxes.
Also automatically calculates and displays the Net PO Value in foreign currency if the Vendor deals in foreign currency.
Click on button to continue.
Click on the  button to upload all the attached Files.
Once you have entered all the information, click on 'Save' button to save or 'Cancel' button to discard. The control will go back to the list.
 button to finally authorize the selected records.
 button to add new Delivery Schedule in the grid. A new row will be added in the grid. Please note that you can add a Delivery Schedule only in case of a 'Direct PO'. This icon will not be displayed in case of 'Indent Based' PO.
 icon to remove a record from the grid. Click on the 'Delete' icon again to un-delete the record. Please note that you can delete a Delivery Schedule only in case of a 'Direct PO'. This icon will not be displayed in case of 'Indent Based' PO.